The Biggest, Heaviest Pocket Doors I’ve Ever Seen: Specs for Framing 11-Foot Tall Steel-Framed Pocket Doors
Lawrence Winterburn December 3, 2025
TL;DR
The Challenge: Engineer steel-framed oversized pocket doors measuring 11 feet tall, 6 feet wide, and weighing 400 pounds each, with impact forces reaching 1,500 PSI that could wrinkle standard steel studs.
The Solution: Heavy-duty 14-gauge steel framing with triple studs at leading edges, marine plywood reinforcement laminated to steel, 18-gauge diagonal tension straps, and multiple redundant connections using sleeve anchors.
The Twist: After full engineering, the project switched to concrete block walls for better material availability and crew familiarity in Puerto Rico. The engineering wasn’t wasted—it informed the final design and proved sometimes the best solution is recognizing when to pivot.
Key Takeaway: Non-standard applications require non-standard engineering. Manufacturer details work for typical installations, but extreme applications need custom solutions with multiple layers of reinforcement.
How do you frame a pocket door that’s 11 feet tall, 6 feet wide, and weighs 400 pounds? Especially when the impact force could wrinkle standard steel framing like a tin can?
Picture this scenario: an 11-foot tall, 6-foot wide pocket door weighing around 400 pounds sliding into a wall cavity and slamming to a stop in half an inch of travel. We’re talking roughly 1,500 PSI of force hitting steel studs. That kind of impact will wrinkle standard steel stud framing.
I studied the assembly drawings and photos from the window manufacturer’s website to understand how it works. The doors slide on a track much like a patio door with tracks top and bottom. They attach a rubber bump stop to the track at the end. I can see that coming clean off if anyone slammed that door with any force.
How We Got Here (And Why Details Matter)
This Puerto Rico project had already been through one fired architect before I got involved. The second architect seemed accommodating enough and was easy to work with, but his working drawings, though they looked complete, were missing some rather important details:
- No details for drop-down screens (interior or exterior)
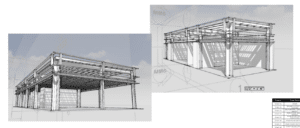
- No ceiling structure specifications – that’s sort of an important detail
- Steel member sizes that didn’t match the actual materials available
- Frame set too deep into the concrete slab, creating HVAC issues we’ll get into later
Safe to say, not many sizes of steel members matched the drawings, and the concrete slab issues cascaded into other problems. For complex projects like this, you need an understanding owner, an ultra-sharp project manager, and somebody to help put everything together and make it all work on paper.
Speaking to Skip, the site superintendent, he suggested adding some extra rubber stops along the track. Great idea. This is exactly the kind of field wisdom that saves projects.
Our 3D detailing also proved invaluable when English is not the first language for installation crews, like at this Puerto Rico project. Visual communication transcends language barriers and prevents costly mistakes.

The Research Phase: Finding Solutions Where None Existed
As a carpenter first, I know the forces I’m dealing with. I’ve done some steel stud work over the years, but not that much. I was never a fan of that tinny sound you get when you knock on or bump into steel-framed walls. I was never a fan of the movement either – that flex you feel with standard steel stud construction.
I went to the internet looking for similar applications. Nothing online came anywhere close to this challenge. I spent a couple of days refreshing myself on the developments in steel framing of the past 30 years since I had worked in steel doing commercial work. The industry has come a long way, with stronger gauges, better fastening systems, and improved engineering data.
But even with all those advances, I couldn’t find a single example of someone engineering pocket doors this massive in steel framing. This was uncharted territory.
The Engineering Challenge
Key Specifications:
- Door height: 11 feet
- Door width: Up to 6 feet
- Estimated weight: 400 lbs per door (depending on construction)
- Impact force when stopping: Approximately 1,500 PSI
- Clear span required: 11’6″
- Wall finish: 1-inch concrete tile over concrete backer board
- Finished ceiling height: 11’5″ above finished flooring
The weight alone is substantial, but it’s the kinetic energy of 400 pounds in motion that’s the real concern. When that mass comes to a sudden stop in half an inch of travel, the forces involved are enormous. Standard steel stud construction simply wasn’t designed for this kind of punishment.
Obviously, jobs like this I would expect an engineer’s stamp on the details before they move forward. The owner of the home was reticent about this since his engineer, hired to supervise construction, just defers to the guys building fairly consistently. “Money for nothing,” he said. He trusts us over the engineer – which is flattering but also puts the responsibility squarely on our shoulders to get this right.

Primary Structure Components
Wall Framing System:
- 14-gauge galvanized steel studs (2×8 for pocket walls, 2×6 for standard walls)
- Stud spacing: 16″ on-center if parallel to purlins, 24″ on-center if aligned with purlins above
- Track secured to concrete with 1/4″ Tapcon or suitable concrete fastening system every 24 inches
- End of run secured with 3″ × 3/8″ sleeve anchors for maximum holding power
- Upper track secured to ceiling purlins using three pan head TEK 5 screws per connection
- Heavy gauge C-channel lateral bracing every 4 feet
The 14-gauge steel is significantly heavier than the typical 20-gauge or 18-gauge used in residential construction. This thickness is essential for the loads we’re dealing with.
Pocket Door Assembly Critical Details
This is where the engineering gets serious. The pocket door opening has to withstand massive forces while maintaining precise alignment for the door to operate smoothly.
Leading Edge Reinforcement:
- Triple stud assembly at the leading edge (the exposed edge of the pocket opening)
- Track cap over the triple stud assembly
- Gusset plate at base bolted to slab with 3″ × 3/8″ sleeve anchors
- Two layers of 5/8″ marine plywood laminated with PL Premium adhesive to the steel studs and between layers
- This creates a rigid, damage-resistant surface for attaching the concrete tile finish
Interior Pocket Structure:
- Sandwich wall construction with studs on both sides of the pocket cavity
- Double studs connected with #5 TEK screws throughout the pocket depth
- Triple 2×3 studs at base with gusset bolted to existing slab with 3″ × 3/8″ sleeve anchor
- Two layers of 5/8″ marine plywood inside the pocket cavity, laminated with PL Premium
- This plywood serves as bumpers to prevent the door from sliding through the steel studs and jamming in the track
- 2″ × 11/16″ slot formed into the slab for the door track system
Lateral Bracing System:
- 18-gauge diagonal tension straps on each side of the pocket opening
- Straps connected to the base steel track with pan head screws
- Upper connections to ceiling structure for triangulation
- This diagonal bracing prevents racking and maintains the pocket opening’s geometry under load
Header Assembly:
- 2×6 aluminum lintel by Airmaster spanning the door opening
- Sized for door width plus 4 inches and 1/2 inch for jamb clearance
- Supported by the reinforced jack studs at each side
Wall Finish System
The finish system adds significant weight that the structure must support:
- 4×8 sheets of 1/2″ concrete backer board secured with #8×1″ screws (LOX HS8100JBW)
- Textured concrete panels by Konkrete X (Float style), 4′ × 2′ panels
- Panels secured to concrete backer board with high-tack polymer adhesive
- Joints sealed with high-tack polymer adhesive
- 6″ × 24″ stone wool insulation (Roxul or equivalent, no vapor barrier required)
The Plot Twist: When Plans Change
Now here’s the kicker that every builder will relate to: this detail changed before the walls were actually built. They changed gears and went with block walls filled with concrete, and a few concrete sections with plumbing encased.
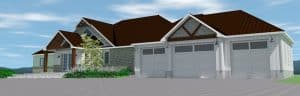
That’s just the way ultra-unique projects like this go. You move forward in one direction, develop the details, price the work, and then adjust for efficiency and to suit the abilities of the crew you have access to. Puerto Rico is a hard place to build regular homes, let alone a steel-and-glass monolith like this residence.
The switch to concrete block made sense from a durability and availability standpoint. Concrete block is readily available in Puerto Rico, local crews are familiar with it, and it provides the mass and strength needed without the complexity of the steel stud assembly.
But that doesn’t mean the steel stud engineering was wasted effort. It informed the concrete block design and gave everyone involved a deeper understanding of the forces at play.
Lessons Learned: Engineering Massive Pocket Doors
When you’re breaking new ground – whether it’s massive pocket doors or any other engineering challenge – certain fundamentals matter:
Understand the Forces: 400 pounds in motion creates serious impact loads. Calculate the worst-case scenario and design for it. The manufacturer’s standard details assume normal residential use, not architectural-scale applications.
Don’t Rely on Manufacturer Details Alone: Standard solutions don’t work for non-standard applications. The window manufacturer’s rubber bump stop might work for a standard patio door, but it’s inadequate for an 11-foot tall, 400-pound door.
Reinforce, Then Reinforce Again: Marine plywood laminated to steel studs, diagonal tension straps, triple studs at critical points, heavy gauge C-channel bracing – what looks like overkill on paper is often just barely enough in reality.
Listen to Your Field Crews: Skip’s suggestion to add extra rubber stops along the track was brilliant. The people installing and maintaining these systems often have insights that don’t make it onto engineering drawings.
Stay Flexible: The best plan on paper might change when reality hits. Material availability, crew capabilities, and site conditions all factor into the final solution. Don’t be so attached to your design that you can’t pivot when needed.
Detail Everything in 3D: Especially on international projects where language barriers exist, 3D details save time, money, and misunderstandings. A picture truly is worth a thousand words – or a thousand mistranslated instructions.
Final Thoughts
Would I build this exact steel-framed detail again? Probably not – we went with concrete block instead, which proved to be the better solution for this specific project and location. But the exercise of engineering this steel-framed solution taught me volumes about modern steel framing capabilities and, more importantly, its limitations when pushed to extremes.
Sometimes the best designs are the ones that teach you what not to do. And sometimes, they’re the ones that get replaced by something better before a single screw gets driven. That’s not failure – that’s the design process working exactly as it should.
The key takeaway? When you’re dealing with forces and scales that exceed standard construction practices, there are no shortcuts. Every connection matters, every reinforcement serves a purpose, and every detail needs to be thought through from multiple angles. That’s what separates adequate construction from engineering that actually works.
See the work our Deck Builder in Barrie does– We do all their design and detailing!


